Done it! MT 4.2, as committed, did not impose any chores on me. Complete as well as perfect automated process made me stay away from detailed installation. Now, MovableType 4.2 is with me only after a whole day endeavor to migrate my own styles and templates (inevitably and intrinsically manual labor by blog owner)
Attractive publishing perforamce is a great plus. Wrist watch read more than three minutes upon the last build on MT 4.1 right before the migration. MT 4.2, on the other hand, gives out around one minute or so in seconds from publishing result window.
(Tested on Movable Type 4.1 with professional pack)
Whenever a change of column layout was in need, I directly modified side bar template with three or two columns layout unchanged. Furthermore, widths for respective columns were out of my control. While tracking templates and style sheet, I came up with a clue how to customize column layout then poured a couple of hours to make my blog seen as it is now aiming at expanding the number of columns of entrance page from three to four (or more ideally). Followings are what I did to achieve the goal. Correct me please if there is something wrong. Any comment or suggestion for improvement will be appreciated, too. (I am not a MT guru)
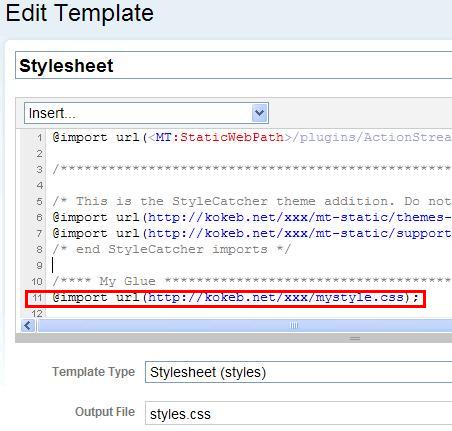
1. Adding new style sheet for override
A screen capture below shows you how I overrode existing style by adding my own at the bottom of main style sheet. After that, I created the customized style sheet, named mystyle.css, from Blog templates (index templates) section of MT administration menu. You may modify or put my copy (mystyle.txt) into your preferred location.
2. Defining columns layout and scheme on that new style sheet
Adding delta-inner and epsilon-inner (experimental and future expansion purpose only) will be enough because existing MT style sheets have sections of alpha-inner, beta-inner, and gamma-inner. Inspection said that the summed length of each columns were 940px in maximum for proper tabulation. You may put your own width as long as the entire length does not exceed that size. Putting a certain name for this column structure is everything to do. For this blog, I named it with myhome. Look up excerpts (mystyle.txt) commented by "MY HOME" and around.
3. Changing sidebar by slight modification
Modifying sidebar template can be inevitable; it will be preferable minimizing the change and/or making it independent from system wide template/style change. This is link is for sidebar template. I've just added "else" conditions to put my own control below it. Look up excerpts commented by "below added by hyok"(sidebar.txt) or around. One thing kept in mind is that a division "delta" MUST be newly and entirely added as suggested.
4. Applying new layout
As shown below, I changed "page_layout" value into "layout-myhome" made from above in main index template section. That's all.
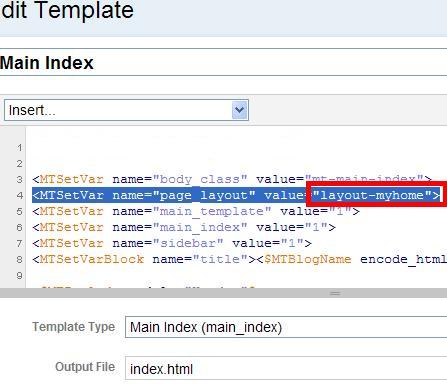
You may need to revisit step two and three to approach an optimal point in column width and widget placement.
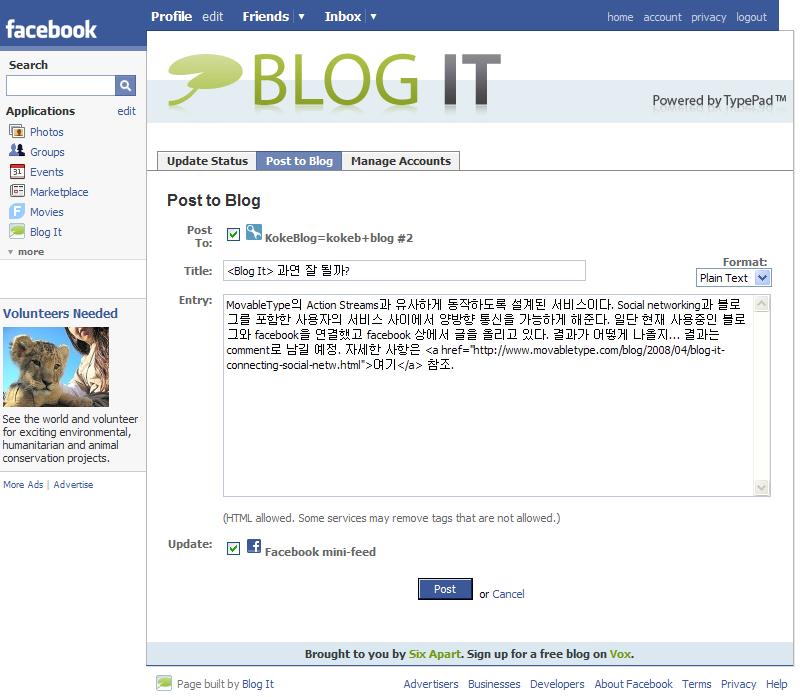
MovableTypeì˜ Action Streamsê³¼ ìœ ì‚¬í•˜ê²Œ ë™ìž‘하ë„ë¡ ì„¤ê³„ëœ ì„œë¹„ìŠ¤ì´ë‹¤. Social networkingê³¼ 블로그를 í¬í•¨í•œ ì‚¬ìš©ìž ì„œë¹„ìŠ¤ 사ì´ì—ì„œ ì–‘ë°©í–¥ í†µì‹ ì„ ê°€ëŠ¥í•˜ê²Œ 해준다. ì¼ë‹¨ 현재 ì‚¬ìš©ì¤‘ì¸ ë¸”ë¡œê·¸ì™€ facebookì„ ì—°ê²°í–ˆê³ facebook ìƒì—ì„œ ê¸€ì„ ì˜¬ë¦¬ê³ ìžˆë‹¤. 결과가 어떻게 나올지... ìžì„¸í•œ 사í•ì€
여기 참조.
(요기서부터 수ë™ìœ¼ë¡œ ìˆ˜ì •/추가한 부분)
아래 그림 처럼 facebook ìƒì—ì„œ ê¸€ì„ ìž…ë ¥í•˜ë©´ ìžì‹ ì˜ ë¸”ë¡œê·¸ì— ê¸€ì´ ì˜¬ë ¤ì§‘ë‹ˆë‹¤. ì•„ì§ì€ facebookì—ì„œ MTë¡œ 글 올리기만 가능한 ìƒíƒœì´ê³ , Action Streams는 지ì›í•˜ì§€ 않는 것으로 보입니다.
무버블타입(ì´í•˜ MT)ì„ ì´ìš©í•´ 설치형 블로그 ìš´ì˜ì‹œ 호스팅 ì—…ì²´ ì„ ì •ê³¼ ê´€ë ¨í•œ ê²½í—˜ì„ ì •ë¦¬í•´ ë³´ê² ìŠµë‹ˆë‹¤. ì œê°€ ì—…ê·¸ë ˆì´ë“œë¥¼ ìžì£¼ í•´ì„œ 서버가 새 ë²„ì „ì˜ ê¸°ëŠ¥ì„ ë”°ë¼ê°€ì§€ 못한 ì ë„ ìžˆê² ì§€ë§Œ, 호스팅 ì—…ì²´ì˜ ì‚¬ì •ì„ ê°ì•ˆí•´ë„ 너무 하다는 ìƒê°ì´ ë“ ê²½ìš°ê°€ ìžì£¼ 있었습니다. ê¸°ìˆ ì 으로나 서버 관리차ì›ì—ì„œ 사소한 ë¬¸ì œì— ëŒ€í•´ (ì¼ë¶€ëŠ” 중요하기는 합니다만) 세심한 지ì›ì´ ì•„ì‰¬ì› ìŠµë‹ˆë‹¤.
현재 ìµœì‹ ë²„ì „ì¸ 4.1ê³¼ UNIX í™˜ê²½ì„ ê¸°ì¤€ìœ¼ë¡œ 설명합니다. ì´ì „ ë²„ì „ì—ì„œ ì—…ê·¸ë ˆì´ë“œ ì˜ˆì •ì¸ ê²½ìš°ì—ë„ ì¼ë¶€ ì°¸ê³ ê°€ ë 것입니다. ë˜í•œ MT ë˜ëŠ” ìœ ëª… 플러그ì¸ì˜ 부가 기능 모ë‘를 í™œìš©í• ê²½ìš°ë¥¼ ê°€ì •í•˜ê² ìŠµë‹ˆë‹¤. 단순히 ê¸€ì„ ì˜¬ë¦¬ê³ ê´€ë¦¬í•˜ëŠ” 주요 ê¸°ëŠ¥ë§Œì„ ì‚¬ìš©í•˜ëŠ” 경우ì—는 ì ìš©ë˜ì§€ ì•Šì„ ìˆ˜ 있습니다.
- perl 모듈 지ì›: ê°ê´€ì 으로 ê¸°ì¤€ì„ ì •í•˜ê¸°ëŠ” 모호하지만, 대형 ì—…ì²´ì˜ ê³ ê°€ í˜¸ìŠ¤íŒ…ì¼ ê²½ìš° ì•ˆì •ì„±ê³¼ 보안ìƒì˜ ì´ìœ ë¡œ 모듈 추가 설치를 거부하는 경우가 있었습니다. 사용 중 ê³„ì•½ì„ í•´ì§€í•˜ê³ ì—…ì²´ë¥¼ ë³€ê²½í• ìˆ˜ ë°–ì— ì—†ì—ˆìŠµë‹ˆë‹¤. ì˜¤ížˆë ¤ ì €ê°€ í˜¸ìŠ¤íŒ…ì˜ ê²½ìš° 모듈 추가나 ë³€ê²½ì„ ìž˜ 해주는 편ì´ì—ˆìŠµë‹ˆë‹¤. 그러나 추가/변경 ìš”ì²ì´ 잦아지ìž, ê²°êµ ëŒ€í˜• 업체와 ê°™ì€ ë…¼ë¦¬ë¡œ 모듈 설치를 거부하였습니다. 최소한 Image::Magickì´ (스팸 ë°©ì§€ì— í•„ìˆ˜ì ì¸ ëª¨ë“ˆ) 설치ë˜ì–´ 있는지, ë˜ëŠ” 추가 설치 가능한지 ì‚¬ì „ì— í™•ì¸í•´ì•¼ 합니다. ActionStreams를 사용 í•˜ë ¤ë©´ XML::Parserì´ ì„¤ì¹˜ë˜ì–´ ìžˆëŠ”ì§€ë„ í™•ì¸ í•˜ì…”ì•¼ 합니다.
- Cron: ìš´ì˜ì— 별 ì§€ìž¥ì€ ì—†ì§€ë§Œ, 있으면 편리합니다. 서버 부하 ê°€ì¤‘ì„ ìš°ë ¤í•´ ëŒ€ë¶€ë¶„ì˜ ì—…ì²´ê°€ ì œê³µí•˜ì§€ 않습니다. ì°¸ê³ ë¡œë§Œ 확ì¸í•˜ì‹œë©´ ë©ë‹ˆë‹¤.
- Sendmail/smtp: 호스트 ë‚´ì—ì„œ ë©”ì¼ ë°œì†¡ì´ ê°€ëŠ¥í•œì§€ 여부입니다. ë³´í†µì€ ì›¹ë©”ì¼ì„ ì œê³µí•˜ë©´ì„œ stmp 서버를 별ë„ë¡œ ìš´ì˜í•˜ê¸° ë•Œë¬¸ì— MTê°€ ì„¤ì¹˜ëœ í˜¸ìŠ¤íŠ¸ ë‚´ì—서는 sendmail/smtp 실행 ê¶Œí•œì´ ì—†ëŠ” 경우가 대부분 입니다. ì´ê²ƒë„ ì°¸ê³ ë¡œë§Œ 확ì¸í•˜ì‹œë©´ ë©ë‹ˆë‹¤.
- 기타: ìƒê¸° 사í•ì´ MT를 설치하게 ë 호스트 ë‚´ì— ì¤€ë¹„ ë˜ì–´ 있는지 확ì¸í•˜ì…”야 합니다. ì—…ì²´ ì°¨ì›ì—ì„œ MT를 지ì›í•œë‹¤ê³ 하는 경우ì—ë„, ìš´ì´ ì—†ìœ¼ë©´ ìžì‹ ì˜ MTê°€ 설치ë 호스트ì—는 준비가 안 ë˜ì–´ 있는 황당한 ê²½ìš°ë„ ìžˆìŠµë‹ˆë‹¤.
호스팅 ì—…ì²´ ì„ ì •ì— ë„ì›€ì´ ë˜ì—ˆìœ¼ë©´ 합니다.
Finally, my movable type archive and supporting scripts moved to the US for hosting services in Korea did not meet full requirements in some functionalities to enable movable type itself as well as plug-ins that go with movable type 4.1 now and, probably, with future versions. My installation staying in Korea over the last three years moved around one hosting service to the others upon seasonal updates and upgrades whenever available. Supports for movable type users were extremely limited or out of consideration for hosting service business in most cases.
This is largely due to low popularity of movable type in Korea. On the other hand, it's because movable type runs on perl environment that should be platform independent but would be extra module dependent in effect. Core problem came from the fact that most hosting providers would not want themselves to install those extra modules for fear of making their system unstable or going malfunction.
I just gave up negotiating with service providers in Korea to claim to increase quality of service in technical standpoint for movable type. Now, SA certified hosting provider in the US where I am delivers high quality of service to meet system requirement of movable type in perfect. Swift response like flashlight is a plus why I migrated from Korea even at the cost of network response lagging over the Pacific Ocean.
A blog renovation completed just ago. Purchase of professional pack, thought of as one of idiot action by blogging gurus, boosted it accordingly. A combination of the adaptation to MT4.1, brand new features from professional pack, and cutting edge plug-ins available only from MT4.1 made me confused to set up a blog sphere keeping the entry link consistency with new features at my hand. However, the fact that I paid for commercial software for the first time in my life gave me more inspiration to maximize its functionality. Big changes include,
- Application of Universal Web Templates from professional pack to incorporate non-blog web pages which used to exist in form of external links from blog
- Installation of Action Streams plug-in to trace events from elsewhere
How about a new face of kokeb.net?
Movable Type (MT) 4.1ì„ ì›¹í˜¸ìŠ¤íŒ… ìƒì—ì„œ ì§ì ‘ 설치해 ìš´ì˜í•˜ëŠ” 경우, Flickrì˜ ì‚¬ì§„ì„ MTì˜ íŠ¹ì • 블로그 asset으로 활용하는 방법입니다. 블로그 dashboard ìƒì˜ Upload File ê¸°ëŠ¥ì„ ì´ìš©í•˜ë©´ 개별 ìžë£Œê°€ ë¸”ë¡œê·¸ì˜ asset으로 ë“±ë¡ ë˜ë©° 서버 ìƒì— 등ë¡/ì €ìž¥ ë˜ëŠ”ë° Flickr, YouTube, Amazon ê°™ì€ ì™¸ë¶€ 사ì´íŠ¸ì˜ ìžë£Œ(미디어)를 asset으로 등ë¡í•˜ëŠ” ë°©ë²•ì€ MT 기본 설치 사양ì—ì—서는 존재하지 않습니다.
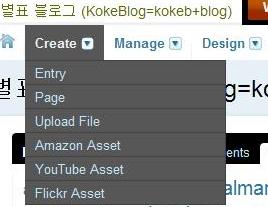
MT 4.1 기준으로, 별ë„ì˜ plugin으로 존재하는 Media Manager를 설치하면 외부 ìžë£Œë¥¼ 블로그 ë‚´ë¶€ì˜ asset으로 등ë¡/사용 가능합니다. 아래 í™”ë©´ì€ Media Manager를 설치한 후 Create ë©”ë‰´ì— ìƒˆë¡œì´ ìƒì„±ëœ ê¸°ëŠ¥ì„ ë³´ì—¬ì£¼ê³ ìžˆìŠµë‹ˆë‹¤. Flickr, YouTube, Amazon으로부터 assetì„ ìƒì„±í•˜ê¸° 위한 메뉴가 ìƒì„±ë˜ì–´ 있ì„ì„ ì•Œ 수 있습니다. 설치 ê´€ì ì—ì„œ YouTube와 Amazon ìª½ì˜ ì„¤ì •ì€ ê°„ë‹¨í•˜ê¸° 때문ì—, 다소 복잡한 Flickr를 ì„¤ì •ì— ëŒ€í•œ ê²ƒë§Œì„ ì •ë¦¬í•˜ê² ìŠµë‹ˆë‹¤.
ì¼ë‹¨ Media Manager를 통해 pluginì„ ë‚´ë ¤ ë°›ì€ í›„, ì••ì¶•íŒŒì¼ ë‚´ì— ë“¤ì–´ 있는 ì„¤ëª…ì„œì— ë”°ë¼ ì„¤ì¹˜í•˜ë©´ 설치 준비는 ë납니다. 설치 ê³¼ì •ì€ íŒŒì¼ì„ mt-staticê³¼ plugin ë””ë ‰í† ë¦¬ì— ë‹¨ìˆœ 복사하는 것입니다. 설치 í›„ì— MT 4.1ì— ìž¬ì ‘ì† í•˜ë©´ DB와 메뉴를 ê°±ì‹ í•œë‹¤ëŠ” 메시지가 나오면서 기본 설치가 ë나게 ë©ë‹ˆë‹¤.
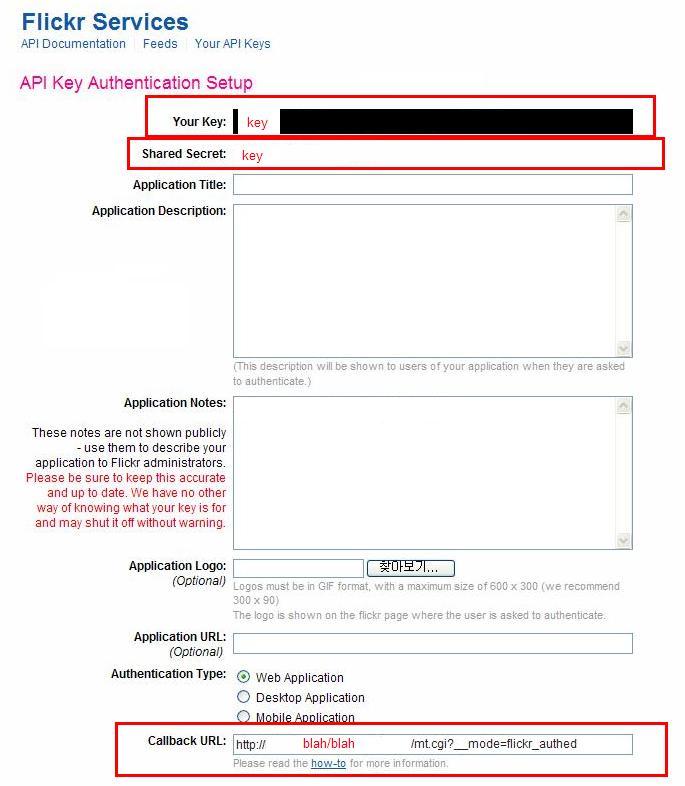
다ìŒìœ¼ë¡œ Flickr API ì„¤ì •ìœ¼ë¡œ 가서 <Your Key>, <Shared Secret>ì˜ ë‚´ìš©ì„ í™•ì¸í•˜ê³ 복사해 놓습니다. Callback URLì—는 http://MT_install_dir/mt.cgi?__mode=flickr_authed ë¼ê³ 넣습니다.
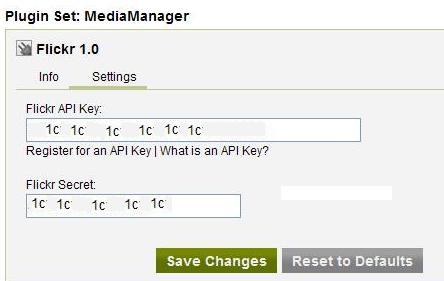
MTê°€ ì—´ë ¤ 있는 ì°½ì—서는 System Overview->Plugins를 통해 아래와 ê°™ì€ í™”ë©´ìœ¼ë¡œ 진입합니다. <Flickr API Key>와 <Flickr Secret>ì„ ë„£ê²Œ ë˜ì–´ 있는ë°, ì•žì„œ 복사한 ê°’ì„ ë„£ê³ ì €ìž¥í•©ë‹ˆë‹¤.
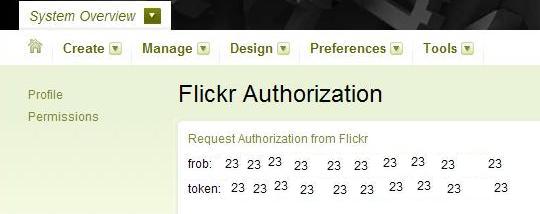
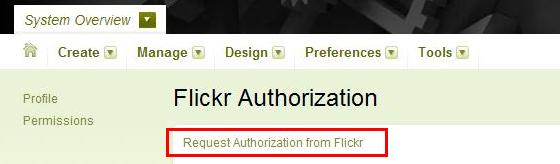
MTê°€ ì—´ë ¤ 있는 ìƒíƒœì—ì„œ ì£¼ì†Œì°½ì— http://MT_install_dir/mt.cgi?__mode=flickr_authed ì„ ê·¸ëŒ€ë¡œ 복사해 ë„£ê³ URLì„ ì—´ë©´, 아래와 ê°™ì€ í™”ë©´ì´ ë‚˜ì˜µë‹ˆë‹¤. <Request Authorization from Flickr> ë§í¬ë¥¼ 누릅니다.
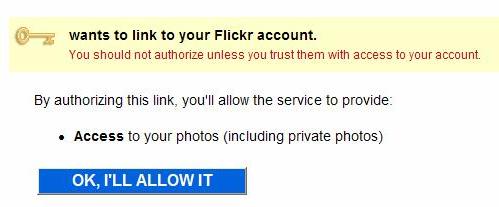
ë§í¬ê°€ 열리면서 Flickrë¡œ ì ‘ì†í•˜ê²Œ ë˜ê³ 아래와 ê°™ì€ í™”ë©´ì´ ë³´ì—¬ì§‘ë‹ˆë‹¤. Flickrì— ì ‘ì†í•˜ê¸° 위해 ID와 암호를 ìž…ë ¥ 요구하면 í‰ì†Œì²˜ëŸ¼ 로그ì¸ì„ 하시면 ë˜ê³ ê·¸ ì´í›„ 아래와 ë™ì¼í•œ í™”ë©´ì„ ë³´ê²Œ ë©ë‹ˆë‹¤. <OK, I'LL ALLOW IT>ì„ ì„ íƒí•˜ë©´ ë©ë‹ˆë‹¤.
ì—°ê²°ì´ ì„±ê³µë˜ë©´ 아래와 ê°™ì€ í™”ë©´ì´ ë³´ì—¬ì§‘ë‹ˆë‹¤. Flickr와 함께 ì¦ê±°ìš´ MT ë¸”ë¡œê¹…ì´ ë˜ì‹œê¸¸...